Second, Photoshop color settings After the monitor is calibrated, you can set the color of Photoshop. Enter the "Edit → Color Settings", you can open the color settings dialog window, 70% of the color management are done here. Figure 2 shows the Photoshop 7 default Color Settings window. The dialog window consists of 6 parts. They are Settings, Workspace, Color Management Options, Conversion Options, Advanced Controls, and Descriptions. If the "Advanced Mode" check box is not activated, there are no "Transition Options" and "Advanced Control" sections. When the mouse is moved to each section, a brief description of the section will be provided in the bottom "Explanation" section. Leg Hold Traps,Trap Metal Galvanized,Animal Trap Possum,Coil Spring Animal Trap Hebei Liebang Metal Products Co.,Ltd , https://www.lb-animaltraps.com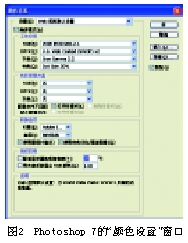
1. Settings in the Settings section
The default setting of "Settings" is "Web Graphics Default Settings", and different settings can be made depending on the purpose of use and the area. When you want to simulate the press standard, you should select “Default for USA Prepress†or “Default for European Prepress†or “Default for Japanese Prepressâ€. If you do not want Photoshop to modify the color, select “Color Management OFF†but it is better not to select it. This item (as shown in Figure 3).
2. Settings for the "Workspace" section
Looking first at the RGB workspace (as shown in Figure 4), we should choose "Adobe RGB (1998)" as the working gamut of the RGB image. The advantage is that the size of the color gamut is moderate, which is larger than the color gamut of the general CMYK printing. Therefore, when the printed color is displayed on the screen, there is usually no overflow phenomenon, and it has been widely accepted as a standard before printing. "sRGB" is mainly used as the working color gamut of network image design. "ColorMatch" is generally a Mac user's choice, and "AppleRGB" is mainly a choice of network image design in a Mac system. These four kinds of work gamuts are device-independent. If you want to set up your own workspace (not listed in the list), you must select the "Custom RGB" option, in the pop-up window, click "OK" after setting the parameters.
Followed by the CMYK workspace, we can select the "Load CMYK" option and select the corresponding ICC profile file according to the printing process for each image. If users are accustomed to using CMYK settings from previous versions of Photoshop, they can select the "Photoshop 5 Default CMYK" or "Photoshop 4 Default CMYK" option. If the image is only used for output on inkjet printers such as Epson, HP, etc., the setting of this item is irrelevant because the printer supports the RGB color space instead of the CMYK color space.
Third, in the gray workspace, we should set accordingly according to the purpose of the grayscale image. For example, the grayscale image for printing can be set as the percentage of Dot Gain required in the printing process (eg, Dot Gain 10%, Dot Gain 15%, Dot Gain 20%, etc.). The user can also select the "Customize Dot Correction" option and set the Dot Gain value as required.
Fourth, the setting of the spot color workspace is similar to the setting of the gray workspace, and will not be repeated here.
3. Settings in the "Color Management Scheme" section
This part is new to Photoshop 6 and has not changed in Photoshop 7. As shown in Figure 5, each color space management scheme has the same three options. Depending on the use of the image output, selecting the "Off", "Keep Embedded Profile", and "Transfer" options in the color management scheme will have completely different effects.
The option "Off" - if the open image has no embedded profile, the image will be edited within the currently defined workspace, and the image will not be embedded when the image is stored; if the image's embedded profile matches the current color setting, The image's property file will be preserved and stored with the image; if the image's embedded property file does not match the current color settings, the original image's property file will be deleted. This option is equivalent to eliminating the color management function.
The option "Retain embedded profiles" - the processing of images without embedded profiles is exactly the same as the option "Off"; if the image embedded profile does not match the current color settings, the image is still described as an embedded profile The color is displayed on the monitor, and the current color setting has no effect on this image.
Options "Conversion" - If the profile embedded in the image does not match the current color settings, the profile is converted to the current color setting.
(to be continued)
ADOBE PHOTOSHOP 7 Color Management (center)
Next Article
Selection of ink rheological additives (3)
Prev Article
2005 Moon Cake Pack Collection (43)